
Securing LiveConfig with Let's Encrypt
Category: LiveConfig
Created: 2020-09-16
Updated: 2021-05-05
Currently it is not possible to automatically secure the LiveConfig web interface (at port 8443) with an SSL/TLS certificate from Let’s Encrypt. The only reason for this is that the domain validation process requires a web server running on port 80.
But by using a reverse proxy configuration you can nevertheless secure LiveConfig with Let’s Encrypt. At the same time, LiveConfig will be accessible via the “default” SSL port (443), so that you can omit the :8443 from the URL. The only requirement is that on the same server where LiveConfig is running also a web server (Apache or NGINX) must be installed and managed by LiveConfig.
-
choose a domain name via which LiveConfig should be accessible (e.g.
liveconfig.example.org). -
create a (small) hosting subscription and add the domain there. This subscription doesn’t need PHP or databases, as it is only used for a reverse proxy configuration.
-
edit the LiveConfig configuration file (
/etc/liveconfig/liveconfig.conf):-
enable the following setting, so that LiveConfig keeps accessible via port 8443:
http_ssl_socket = *:8443 -
add the following setting, to make LiveConfig accessible on port 82 at the local server via HTTP (not HTTPS!):
http_socket = 127.0.0.1:82The actual port number doesn’t matter as long as it is below 1024, so that only root is allowed to start processes with it.
-
then add the following settings to let LiveConfig recognize proxy requests (see also Running LiveConfig behind a proxy):
http_proxy_ip_from = 127.0.0.1
http_proxy_url = https://liveconfig.example.org
# if you're using Apache as proxy web server:
http_proxy_ip_header = X-Forwarded-For
# if you're using NGINX as proxy web server:
http_proxy_ip_header = X-Real-IP
-
-
restart LiveConfig (
systemctl restart liveconfig) -
configure at Hosting -> Domains the subdomain added in steop 2 as reverse proxy to the new localhost address of LiveConfig (destination URL:
http://127.0.0.1:82/).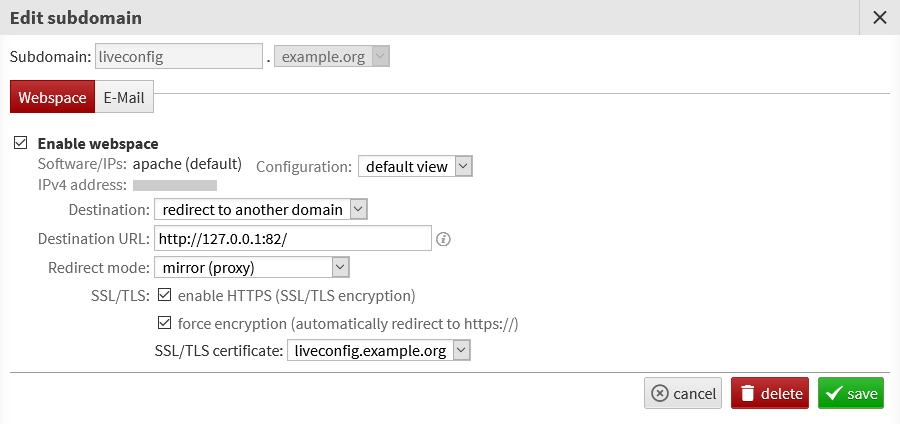
You should then be able to access LiveConfig directly via the new domain. This means you can also create an SSL/TLS certificate with Let’s Encrypt for this domain.