
Site.pro Website-Builder
Kategorie: LiveConfig
Erstellt: 18.03.2020
Aktualisiert: 25.05.2021
Diese Anleitung beschreibt die Integration des Site.pro Builders in LiveConfig.
Voraussetzungen
- LiveConfig 2.12.0 (oder aktueller)
- Site.pro-Lizenz
Install Site.pro On-Premises Builder
-
Log in to LiveConfig and create a new web hosting subscription (exclusively for the Site.pro builder). The subscription should have:
- at least 10 GB webspace
- PHP (preferably with FPM)
- 1 MySQL database
- 3 Cron jobs
- SSH access
-
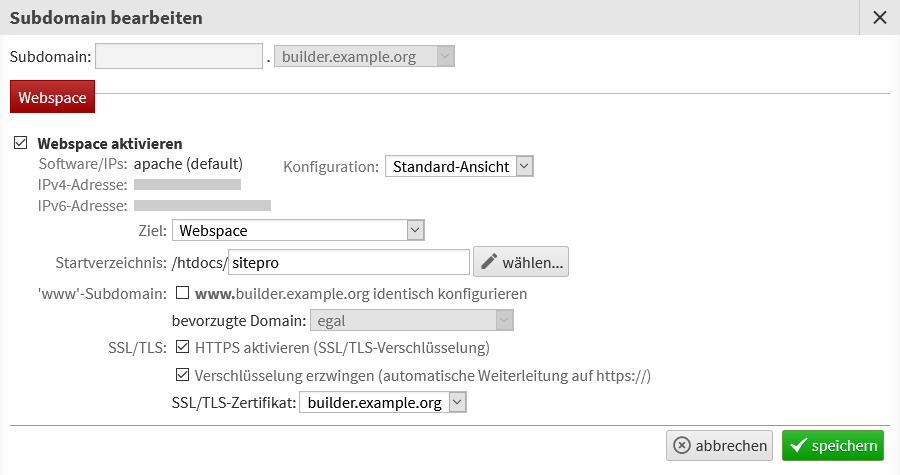
Configure a domain/subdomain and add it to this new subscription (for example
builder.example.org). -
Install and enable ionCube loader on this subscription (for Debian/Ubuntu: see here).
-
Log in via SSH with the new subscription account and create a directory for the builder:
user@srv:~$ mkdir htdocs/sitepro user@srv:~$ cd htdocs/sitepro -
Download Site.pro builder from the here, e.g.:
user@srv:~/htdocs/sitepro$ wget https://update.site.pro/_installer/builder/SitePro_Builder_v4_php71.tar.gz -
Extract the archive to the current directory:
user@srv:~/htdocs/sitepro$ tar xvf SitePro_Builder_v4_php71.tar.gz -
Remove the download archive:
user@srv:~/htdocs/sitepro$ rm SitePro_Builder_v4_php71.tar.gz -
Edit the two files
.htaccessandv3/.htaccessand replace the optionFollowSymLinkswithSymLinksIfOwnerMatchin both files:# Follow symbolic links in this directory. #Options +FollowSymLinks Options +SymLinksIfOwnerMatch -
In LiveConfig, set the document root for this new domain/subdomain, enable HTTPS (SSL/TLS) and configure automatic redirect from HTTP to HTTPS.
-
Open the Site.pro builder in your browser and follow the instructions (e.g. https://builder.example.org/installer/).
The installer will check PHP limits and dependencies. Later you’re asked for database credentials (so create a new MySQL database in LiveConfig and enter the data in the Site.pro installer).
You will also be asked for an API Username, API Password and On-Premises Brand ID. For this step:
-
Log in to the Site.pro license management: https://site.pro/My-Licenses/
-
Click the button “ADD BRAND”. Choose on-premises type, add the IPs of your web server(s) (where the websites should be published at), and the domain name of your website builder installation:
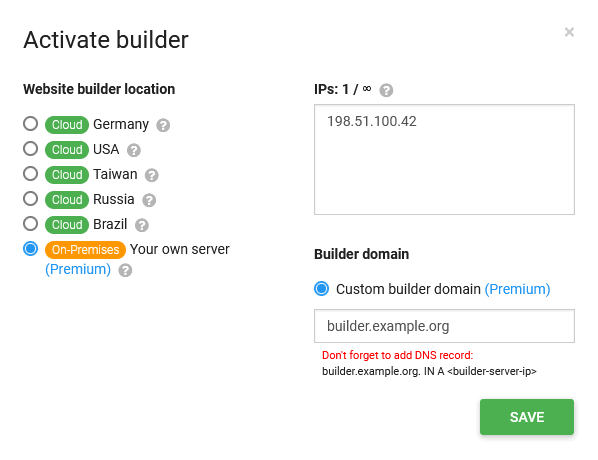
Don’t worry if you get an error message after saving (There was an error while synchronising license with your builder server.), this is because the installation isn’t finished yet.
Then click the “MANAGE” button beside your new created brand. You will see the API credentials on top of the popup window. Copy & paste these values into the installer.
-
-
If installation has succeeded, remove the folder
installation/from your webspace.user@srv:~/htdocs/sitepro$ rm -rf installer -
In LiveConfig, add a cron job for Site.pro. It should run every minute, the command is
cd htdocs/sitepro && php cron.php: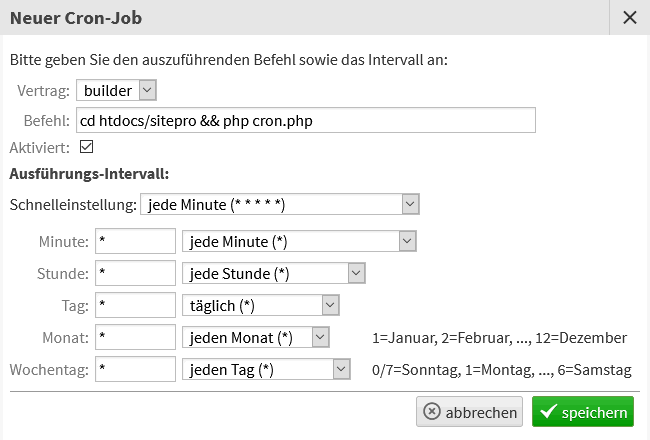
-
Finally, go back to the Site.pro license management and customize your builder settings (set title, language, plans, etc.).
For more informations on Site.pro builder installation see the Site.pro Documentation.
Install Site.pro module for LiveConfig
-
Install the package lc-mod-sitepro, depending on your distribution:
-
Debian/Ubuntu:
root@srv:~# apt install lc-mod-sitepro -
CentOS / Red Hat Enterprise Linux:
root@srv:~# yum install lc-mod-sitepro -
openSUSE:
root@srv:~# zypper install lc-mod-sitepro
-
-
Restart LiveConfig to load the new module (
service liveconfig restart) -
Log in as admin to LiveConfig, open the extensions tab in Administration -> LiveConfig
-
Click the button Add extension…
-
Select Site.pro extension
-
Add your brand id, username and password (use the same API user and password as above during installation, you find these when editing the “brand id” within the Site.pro License Manager)
The sub-order id is the ID number of your license package. You find this also within the Site.pro License Manager, in the bottom-left corner of the “Package” box. This is required for managing the list of allowed IP addresses.
The API URL consists of the URL of your on-premises installation, plus
/api(e.g.https://builder.example.org/api)
Add Site.pro builder to your hosting plans
- Open the extensions tab in Hosting -> Hosting plans
- Enable the website builder checkbox and select the website builder.